Taking subscription payments from a JAMstack site
Subscription payments
With the new Subscription Payments feature in Trolley, it's now easy to accept recurring amounts from customers from a static / JAMstack website.
With just a Trolley account, Stripe and 5 minutes you can accept recurring payments, monthly donations and other forms of subscription payment with no coding and no hassle.
Here's how.
Get a Trolley account
First sign up for Trolley.
It's free to create an account; Trolley takes a small commission on each purchase of your product, so Trolley only makes money when you do (this is the same way that Stripe works too)
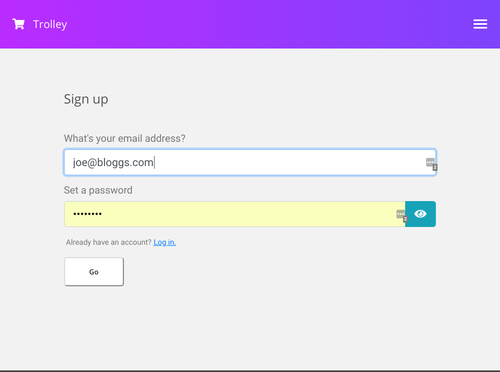
Follow the simple prompts to connect your Stripe account (or create one, if you haven't got one already)
Remember - if you're just getting started, you don't need a business bank account to use Stripe! If appropriate, you can sign up as a sole trader no problem at all and be paid into your personal bank account.
Set up the subscription in Stripe
Trolley leans on Stripe for managing subscriptions in the back end - they do it very well!
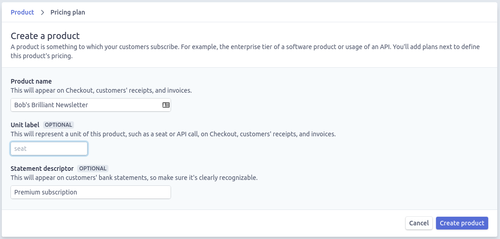
Login to your Stripe dashboard and go to Order > Products
Hit the Create product button and you'll see a form that looks like this.
Fill in the details of your Product - really the important one here is the Product Name (let's call it "Bob's Brilliant Newsletter") but you can fill in the others if you want.
Then press the blue Create Product button at the bottom.
Now we're going to create the Plan - this defines the billing frequency and the price of your product.
You can have multiple plans later on; for now just create a simple one; monthly for five bucks.

Press Add pricing plan and you're done with Stripe setup.
Now we're going to wire it up in Trolley (which takes 2 minutes), then it's onto your website and start selling!
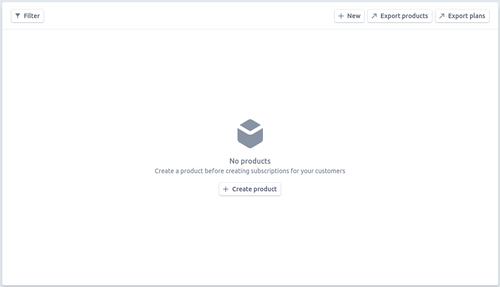
Create your first product in Trolley
Back to your Trolley dashboard
Create the product in Trolley by going to Products and hitting the Create your first product button.
You'll see this product form.
This should be nice and simple and gives you all the options you need (and nothing more!)

Fill in the basic details - name and description - and select that the product is a Subscription.
Now you'll be asked to pick from the list of Plans in Stripe.
You should see the one you created for your Newsletter; select it!
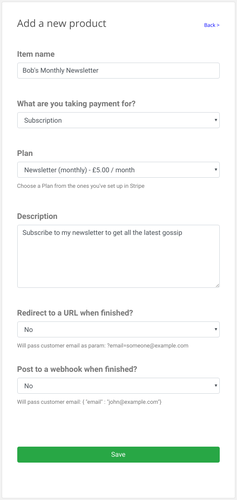
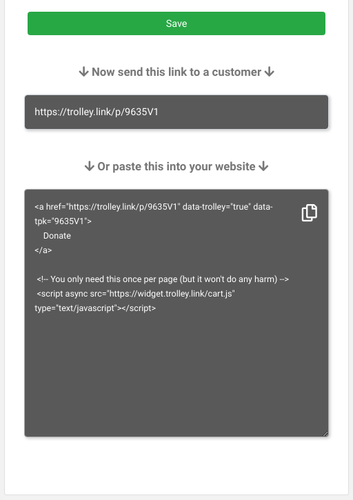
Now press Save and Trolley will give you your HTML snippet.
This is what you're going to put on your website (WordPress, static, JAMstack, any CMS…) - it's all you need to put the payment button on screen for your users and start taking payments.
Copy the snippet (either with the little Copy icon, or by selecting it and Ctrl-C in your browser)
Putting a payment button on your website
I'm going to assume you've already got a website (if you haven't, check out our other blog posts for some quick guides on getting setup with JAMstack or static websites!)
Open up the code for your site in an editor and paste in the snippet where you want the button to appear.
<button data-trolley="true" data-tpk="9635V1">
    Subscribe
</button>

<!-- You only need this once per page (but it won't do any harm) -->
<script async src="https://widget.trolley.link/cart.js"
   type="text/javascript">
</script>
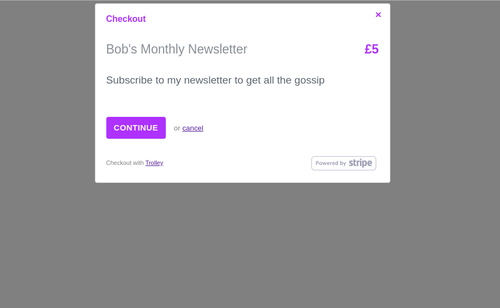
You should see a payment link or button on your site

And when you click it, you'll get the Trolley popup.
And when a customer subscribes, you'll get an email with the details.
There has been an order of: Monthly subscription.

Price: £5.0 GBP
Customer email: customer@example.com
Account email: rg@yourdomain.com
Customer note: subscribe me please!
Payment ref: NKZ3XX
Job done! You're selling subscriptions online.